
(Some images may be enlarged by
clicking on them.)
| Matching Window -- Family
View |
Matching Window -- Pedigree View | Matching Window -- Individual Detail View |
|
|
|
When merging an individual from one GEDCOM database into another, the user is faced with making a decision as to whether the individual, to be merged, already exists in both databases and just has different information stored about him/her in each data base, or whether that individual is an entirely new individual that simply needs to be added in. The JPriseMerge Matching Window has been designed to help make the decision of whether an individual in one GEDCOM database matches up with another individual in another GEDCOM database, as easy as possible.
The Matching Window displays information in different views accessible via a tabbed panel. There is a Family View, a Pedigree View, and an Individual Details View. Each of these views, in turn, hold two side by side panels which display information about an individual, which that panel is currently focused on. The left panel shows data about the individual, it is focused on, where the data is extracted from the merge output file, and the right panel shows data about the individual, it is focused on. where the data is extracted from the merge source file. The colors show where the data came from, and in these examples yellow is showing that the data came from the base file and blue shows that the data came from the merge source file. Note: in the examples shown, the left panel shows all yellow because the merge output file was initialized with data from the base file. As you proceed to merge in data from the merge source file (in the Three Pane Merge Window ) the left panels will show a mixture of colors (yellow and blue in this case) showing where the data came from. (See Getting Started -- files and concepts for further information about these files.)
It isn't necessary for each panel in each view to be focused on the same corresponding individual in the data bases. See Navigating below for further info about Locked verses Unlocked modes of viewing information between databases.
(Image may be enlarged by clicking on it.)
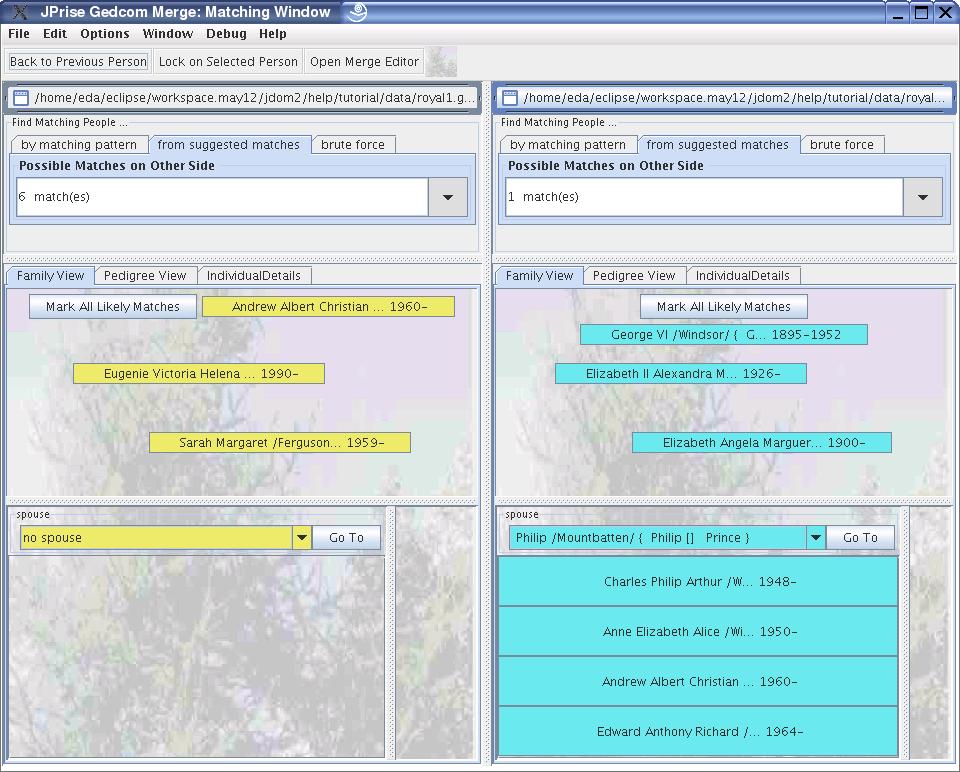
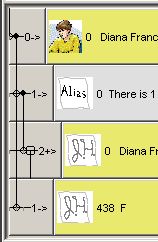
The Family View shows the relationship of an
individual to his immediate families. The two panels shows the parents,
spouses, and children of an individual using data from the
corresponding GEDCOM database represented by that panel. The top half
of a panel shows the selected individual and his/her parents. The
bottom half of a panel shows the individual's spouse and their
children. Different spouses can be selected (if the selected individual
has/had multiple spouses) from the pull-down list, and the children
displayed will change accordingly. All the children and parents shown
are active links and can be clicked on to change the focus of the panel
to that parent or child. Use the Goto button next to the Spouse
pull-down list to change the focus of the panel to the selected spouse.
(Image may be
enlarged by clicking on it.)
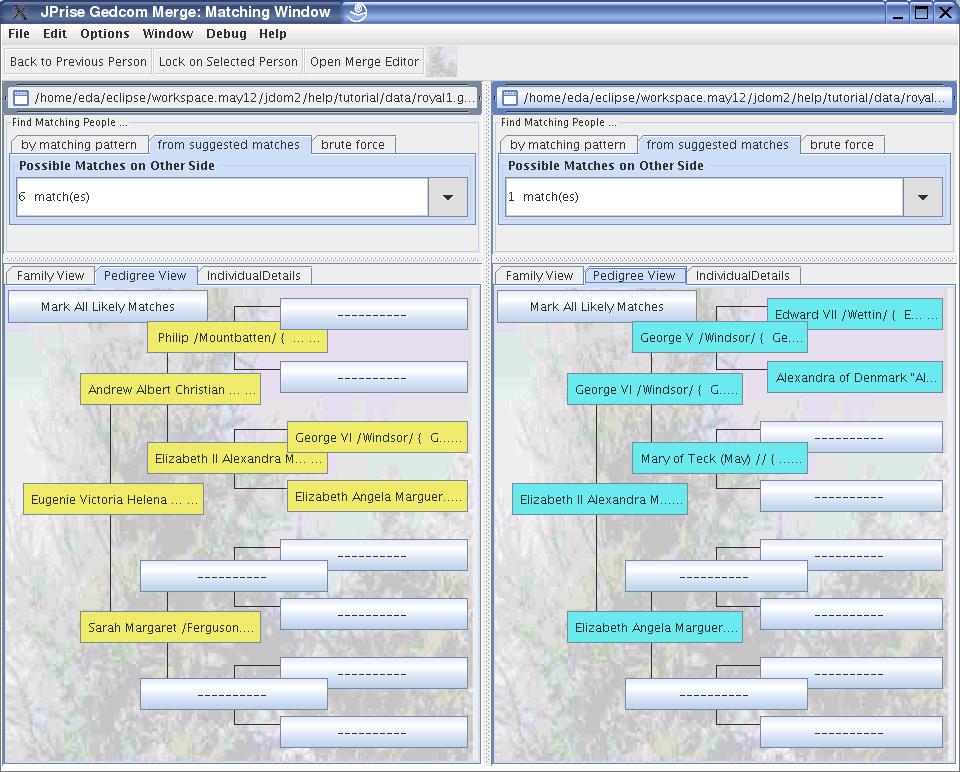
The Pedigree View shows the selected individual and 3 generations of his immediate ancestors, again using data from the corresponding GEDCOM database represented by the panel. All the parents and ancestors shown are active links and can be clicked on to change the focus of the panel to that parent or ancestor.
(Image may be
enlarged by clicking on it.)
The Individual Details View shows all the data associated with the selected individual from the panels corresponding GEDCOM database. GEDCOM data is organized in a tree-like hierarchical fashion and the presentation of the data for an individual reflects this organization. This is a common method of data organization and you can think of it in much the same way as a filing cabinet holds drawers, which hold folders which may hold either more folders or pieces of paper with information
To follow this filing cabinet analogy, the "drawers" are opened by going to the Detail Page Type pull-down menu and selecting the appropriate page to view. This pull-down menu is found at the top of the data list in each panel and is composed of these pages:
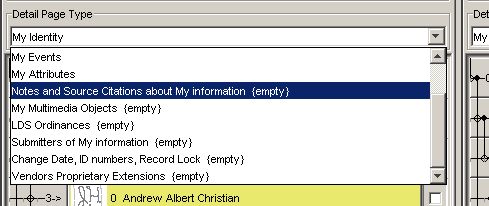
If you are familiar with the GEDCOM specifications, then these categories should be easily understood, if not don't worry, you will get the hang of where specific data is stored after you have played and worked with JPriseMerge for awhile. If the database for a particular category holds no data, for example if there had been no events recorded for the selected individual, then the pull down list will annotate that with an (empty) marker i.e. My Events (empty)
Again using the filing cabinet analogy, each individual detail page shows a list of data items in a nested fashion, just like one might have folders containing other folders or paper. To the left of each item shown, the nest level of a GEDCOM item is shown both graphically and figuratively:
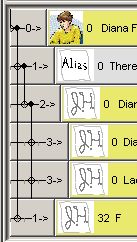
In the nest level example shown above, you can think of this as if there is a "folder" at level 0. This "folder" contains two "folders" which are at level 1. The first of these level 1 "folders" contain a "folder" at level 2. And this level 2 "folder" contains 2 level 3 items. Sometimes the amount of data shown can become a bit unmanageable, even with the graphical aids and numbers. To further help the user manage these lists of data, the nest level buttons can be clicked on to open or close that "folder" When a panel is closed, JPriseMerge creates a summary data panel which describes/summarizes the data "contained by" that panel. Thus if we click on the level 2 button (not the item at level 2) then this list would collapse to look like the following:
Note: The level 2 button has a plus + sign next to it to indicate that this field is currently closed and can be clicked on to open it back up.
There are a number of different kinds of data panels displayed within each Individual Detail Pages and JPriseMerge uses colors to distinguish them. A color legend is located just above the list of data panels.

The color used for each of the various types of data panels can be set from the Color Options menu.
If the following needs further explanation, see GEDCOM Details.With an understanding of how GEDCOM organizes data, we can now describe what the various different types of data panels are and how they are used: This list below summarizes them:
The example below, the left panel shows an individuals (Diana Frances Spencer) detail page opened to show her spouses and children. (The right panel shows a similar set of panels for Prince Charles) The first (topmost) panel on all detail pages is a summary data panel showing the personal name of the individual which the page is describing. The next panel is a container panel describing the number of spouses Diana has. Nested below this container panel will be panels describing each of her spouses. (in this case she only has one spouse)

We will use the example about to further help you, the user, develop an understand of a GEDCOM database, and how JPriseMerge is presenting the information within the database to you. Starting out with the container panel, at nesting level 1, informing us that Diana has 1 known spouse, we see a title panel labeled "First Spouse Charles Philip Auther W..." This panel corresponds to a reference element that is pointing to a family record element in this GEDCOM database. This is actually the ONLY element which truly belongs to the "list" of elements for the above mentioned container panel.
To facilitate the understanding that reference elements are associated with a record element, JPriseMerge displays a panel for the reference element, and then nested immediately below will be the data panels for the various components of the record element to which that reference element referred to. JPriseMerge just displays a label for each title or container panel that is derived, as a good descriptor, based on the data that is contained by elements or components underneath that particular panel. If you wish to see the GEDCOM element name that a panel represents, place your cursor over the panel, and a tool tip will pop up having the GEDCOM element name followed by a colon preceding the label value. Here we see that the panel element which the cursor is hovering over represents a "Family with spouse" GEDCOM reference element.
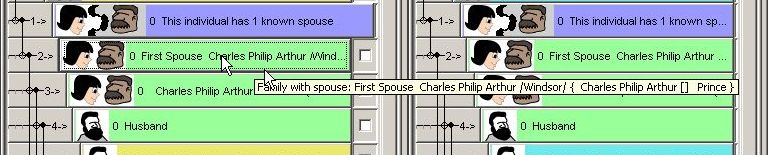
Beneath the data panel representing the Family with spouse reference element, another title panel at nest level 3 is displayed. This title panel is labeled with a name for a family record element. Again this label was derived from data components within the family record element being displayed. (JPriseMerge uses the names of the family's husband and wife for a title panel representing a family record element.)

Within the family record element, there are a number of elements and data components which we will not go into too much detail on. To start out, you see title data panels for the husband and the wife in this family, then we see a container data panel for all the family events which may have occurred, and within this family events container there is a container data panel of marriage events which in turn contains data components and elements describing dates and places of each marriage event. As you explore around the various view panels you will develop a further understanding of how GEDCOM data is stored and presented using JPriseMerge. And if you really want to see just how complex and deep a GEDCOM database can be, read the Debug section for a description of how to open up the view panels so they show all the elements and components that are possible! Except for alignment purposes in the Three Pane Merge window, JPriseMerge only shows data panels for GEDCOM components which actually hold or contain real data.
Before we move on from this description of the data panels, there is one final tidbit of information the user needs to understand. Gedcom data can be recursive in nature. Thus for example a Note record element can contain a Source Citation element which can contain a Note record element which can contain a Source Citation element etc ad infinitum. In a like fashion, as seen in the above example, Individuals can contain elements which contain references to other individuals. JPriseMerge has some built in rules on what data panels should and can be displayed and will not display recursive panels containing empty data beyond a top summary data panel. Thus, in the above example, the Husband and Wife elements contain a reference to an individual within the database. JPriseMerge simply shows this as a summary data panel and will not allow you to open up that data panel and view the recursive information. To see information about an individual referenced within one of the data panels, for an individual, you will have to change the focus of the Matching Window to the individual you wish to view. If you place a cursor over a summary data panel, the tool tip will inform you if and when JPriseMerge stopped this recursive nature of displaying data panels and a short description of why the recursion was stopped.
The first time you see the JPriseMerge Matching Window opened is probably the result of selecting a person to match from the Progress Manager Window. The person you selected appears as the selected person for the right panel in each of the views.. The left panel will be focused on an individual from the base file which is possibly not a matching person. When merging an individual from the merge source file into the merge output file, the first step is to see if there is a matching individual in the base file that corresponds to the selected individual from the merge source file. To accomplish this, you might have to navigate around in the other merge output file's panel to bring it's focus on to the same individual as your merge source file's panel.
As mentioned above, clicking the mouse on an individual's name buttons in the Family or Pedigree views will change the focus of that panel and make that individual become the selected person. JPriseMerge, like most genealogy tools uses the same intuitive approach of allowing the user to navigate around a family tree, moving through ancestors, spouses, and children with the ease of point and click operations. However this is not completely sufficient, and because JPriseMerge is working with two GEDCOM databases simultaneously, there are some additional tools available for navigating.
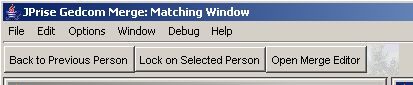
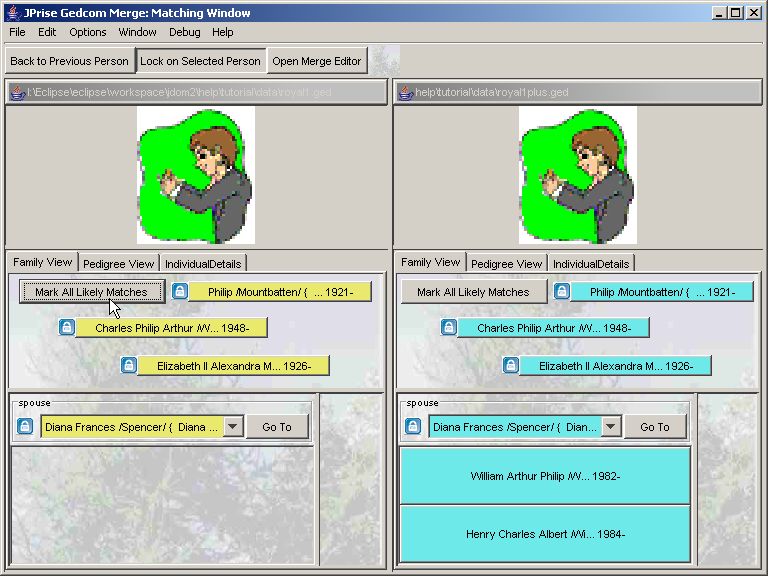
Near the top of the Matching Window, JPriseMerge supplies the user with 3 convenient buttons. The first two, "Back to Previous Person" and "Lock on Selected Person" are navigation aids, the last "Open Merge Editor" will open the Merge Window on the selected individual(s), from which the detailed merge operations can be carried out.
Because JPriseMerge works with two GEDCOM databases simultaneously, it has a concept of being able to lock the navigation of the two databases together, or allow navigation of the two databases to take place independently. Clicking on the "Lock on Selected Person" button toggles the navigation controls between these two states.
When JPriseMerge's Matching Window is placed in the unlocked mode, additional navigation controls will be displayed just under the above mentioned navigation convenience buttons. These controls allow you to either change the focus of the panel you are "in" using string pattern matching on an individuals name, selecting directly from a list of all individuals found in the associated GEDCOM database, or trying to "move" the other panel to navigate to the same individual as the panel you are "in" is focused on.
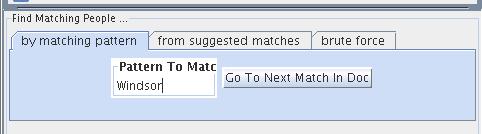
You can find a person (in "this" panel, i.e. the left/right panel in which you are using this control) using "by matching pattern". Enter all or a portion of the name and hit "Go to Next Match" button, and the next person with a name matching the pattern you entered will become the selected person and cause the panel's display to focus on that individual. The pattern matching capability of JPriseMerge is limited to exact matches of the pattern matching string. So for example, given the pattern "Wind" this will match the next individual in the database in which any part of his/her name components start with the string "Wind". So this may match "Windslow Homer" or "Edward Windsor" (this is a case insensitive match which means the patterns "Wind", "wind", "wINd" are all equivalent). JPriseMerge starts the search in the database from the individual the panel is currently focused on. However, the order in which data was entered into the database is dependent upon the vendors tool that was used to create that database, so JPriseMerge cannot predict whether the search order will be alphabetical or in some other ordering. JPriseMerge simply follows the database's data linearly, in the order in which the data was entered in the database file.
Note: future releases of JPriseMerge will supply enhanced pattern matching capabilities, such as the ability to use wild card character matching, matching specific name components , and search order predictability.
Whenever an individual is focused on, in one of the panels, JPriseMerge automatically starts a background search program which searches and analyzes the other data base for likely individual candidates to match the individual you focused "this" panel on. Data entered into two different data bases may vary substantially, due to things like spelling differences, user data entry styles, vender data organization differences etc. So, for example, one user may enter an individual's name with one spelling, a birth date in one format, etc, and another user may enter this same information into his/her GEDCOM data base quite differently.
JPriseMerge uses some very powerful logic to calculate the probability of likely matches between individuals in different data bases. JPriseMerge not only looks at, for example name spellings, but also surrounding information about things such as parents, birth dates, etc, and tries to look at as much common information as possible between databases in order to compute a probability of a match between individuals. In future releases, JPriseMerge will also use some common heuristics in looking at things like date formats and name styles to further refine these probability of match calculations.
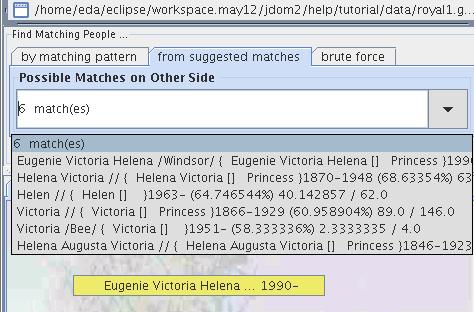
The results of a search of possible matches of the selected individual, in the other data base, is then displayed in a pull down list (of up to 20 individuals). This list is available in the "from suggested matches" panel. These possible matches are displayed in the order JPriseMerge determined, from highest to lowest probability of a match. For the curious, JPriseMerge also shows the probability weighting of a match, that it computed for each individual. This is a percentage with follows the individuals name in the pull down list. It also shows a weighted ratio of the number of components in each database that actually matched each other, versus the number of common components each data base held about that particular individual. (this is a weighted ratio, not exact, with a 50% weighting given to the individuals name components, and 50% given to all the other components of the individual, such as information about his parents, siblings, children, events data such as birth dates and places, attributes data such as nationality etc...)
When JPriseMerge is done computing this list of probable matches of individuals between the two databases, it then presents this list to you, the user. You can click on one of these individuals, and that will cause the "other" panel to focus on and navigate to that particular individual. This is probably the easiest way to bring both panels to focus on the same individual within their respective databases.
It is certainly possible that JPriseMerge cannot develop this list, or comes up with a set of matches that have a very low probability of pointing to the same individual. All this means, is that very likely, the individual you are trying to find a match for, in the other database, does not exist in that data base. In this case you may have to add him/her in as a relative of some other individual that does exist in the other data base.
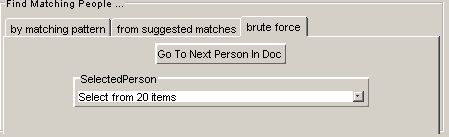
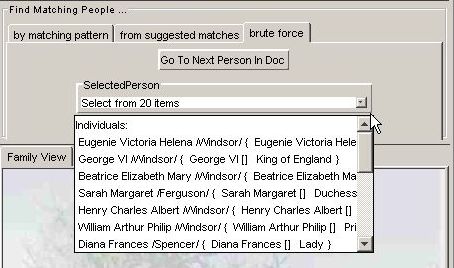
The brute force method of navigating around a GEDCOM database simply presents you, the user, with a pull down list of all the individuals found in the database. The number of individuals in the database is displayed. Depending on the file size this may be either handy or unwieldy. Simply click on the pull-down arrow to open up the pull down list and select the individual you wish to navigate to.
When JPriseMerge's Matching Window is placed in the locked mode, the additional navigation controls, ("Find Matching People" controls) described above, will not be displayed. Instead you will see the first Media picture for the selected individual, if there is one. The only way to navigate, in locked mode is by clicking the mouse on a person in the Family or Pedigree view. This will cause JPriseMerge to attempt to make it the selected person on BOTH SIDES -- but that can only happen if there is a matching individual, in the other database. If JPriseMerge cannot find a match, it will not change selected person and warn you about that.
(Image may be enlarged by clicking on it.
Once a determination is made that two individuals match each other, in the two data bases, JPriseMerge allows you to mark them as such. It helps to know when individuals in the merge source file match up with individuals in the base file or merge output file in several ways. It helps you see information for navigation. It also lets JPriseMerge know when a person is already known to match an individual in the base file or merge output file. and it will not require any future searching for possible matches whenever that individual is revisited. And the more individuals are marked as matching, the less often JPriseMerge will have to ask you to help identify possible matches.To mark two individuals as matching, press the :"Mark All Likely
Matches" button found in both the Family View and the
Pedigree View. JPriseMerge will not only mark the
individuals you have focused each panel on, as matching, but it will do
the same for all the ancestors, immediate children, and spouses that it
can find in both data bases. Each person marked as match is indicate
that with the matching icon. ![]() next to their name.
next to their name.
If the two individuals do not show with exactly the same name on each side, they may not be marked as matched automatically. You can ask more emphatically by using the right-click pop-up menu for such a person, and ask for the match to be recorded. If you see a match recorded that should not be, the right-click-pop-up menu can be used to remove the match.
As individuals are marked as matched or unmatched, the People Progress Manager window will move that individual to it Matched or UnMatched panels as appropriate.
Click here to provide feedback to JPrise Inc.
Copyright © 2004 JPrise Inc. All rights reserved